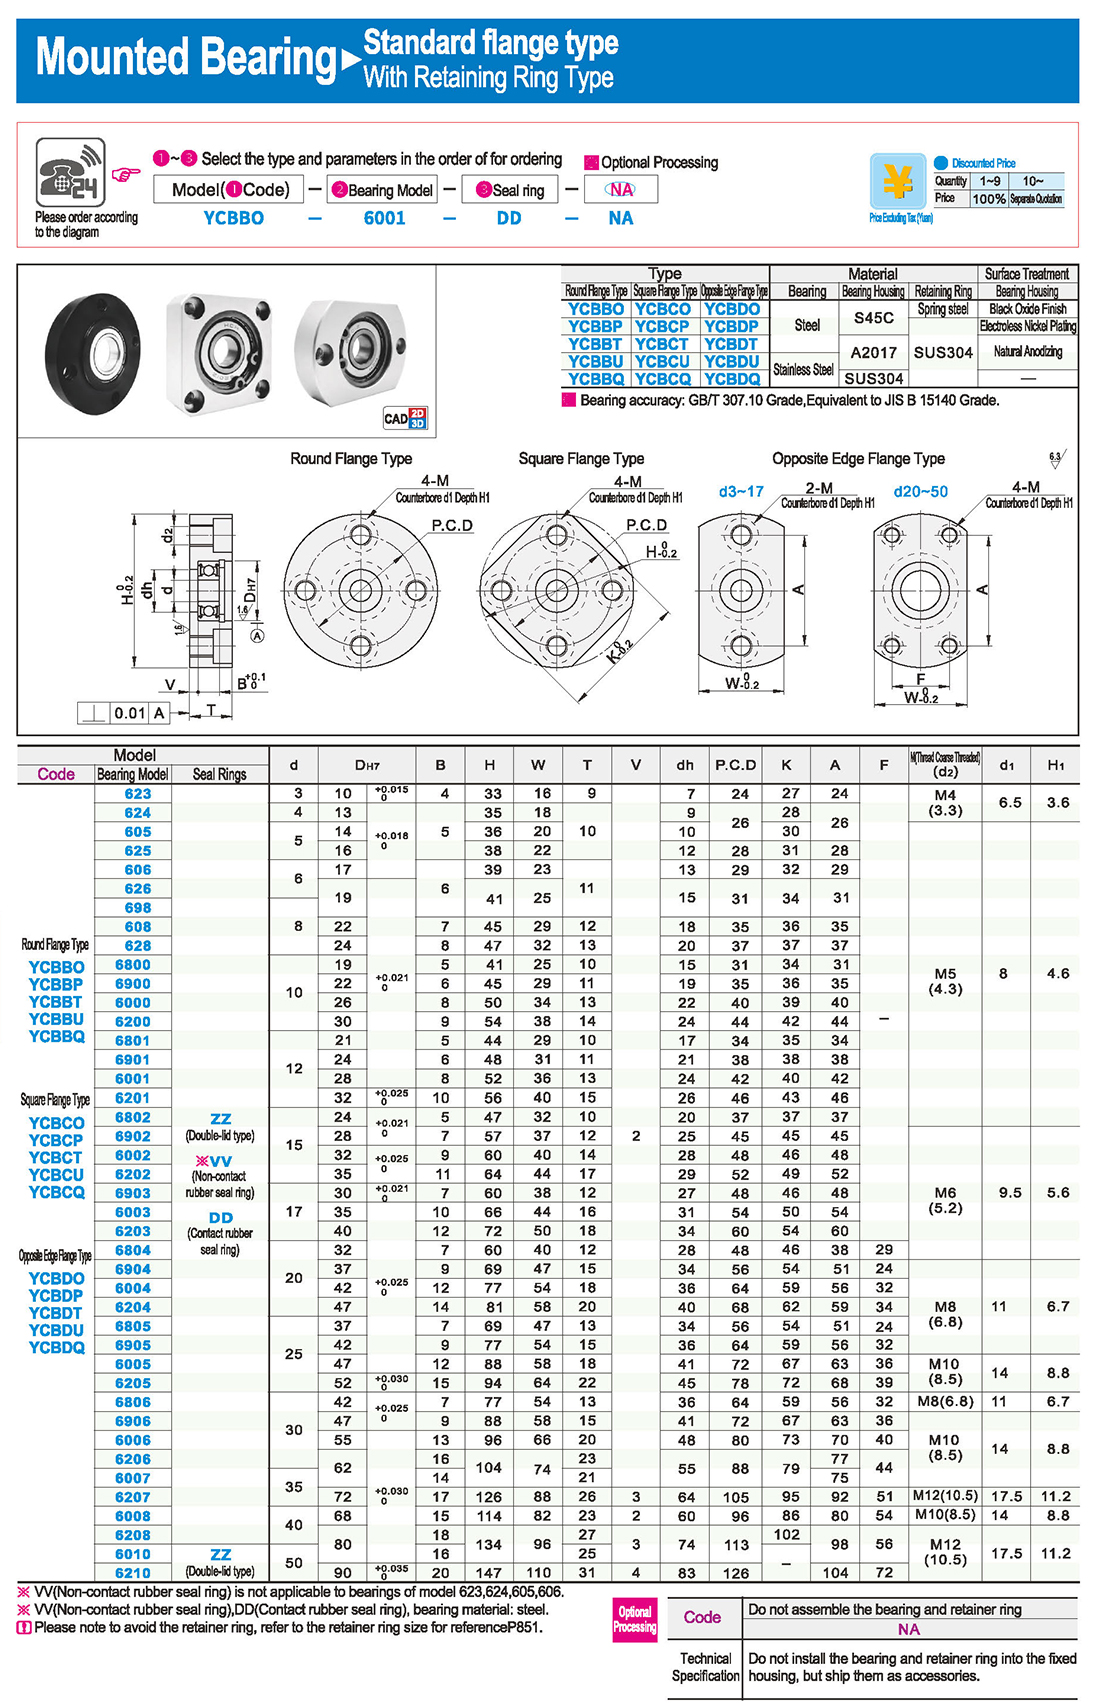
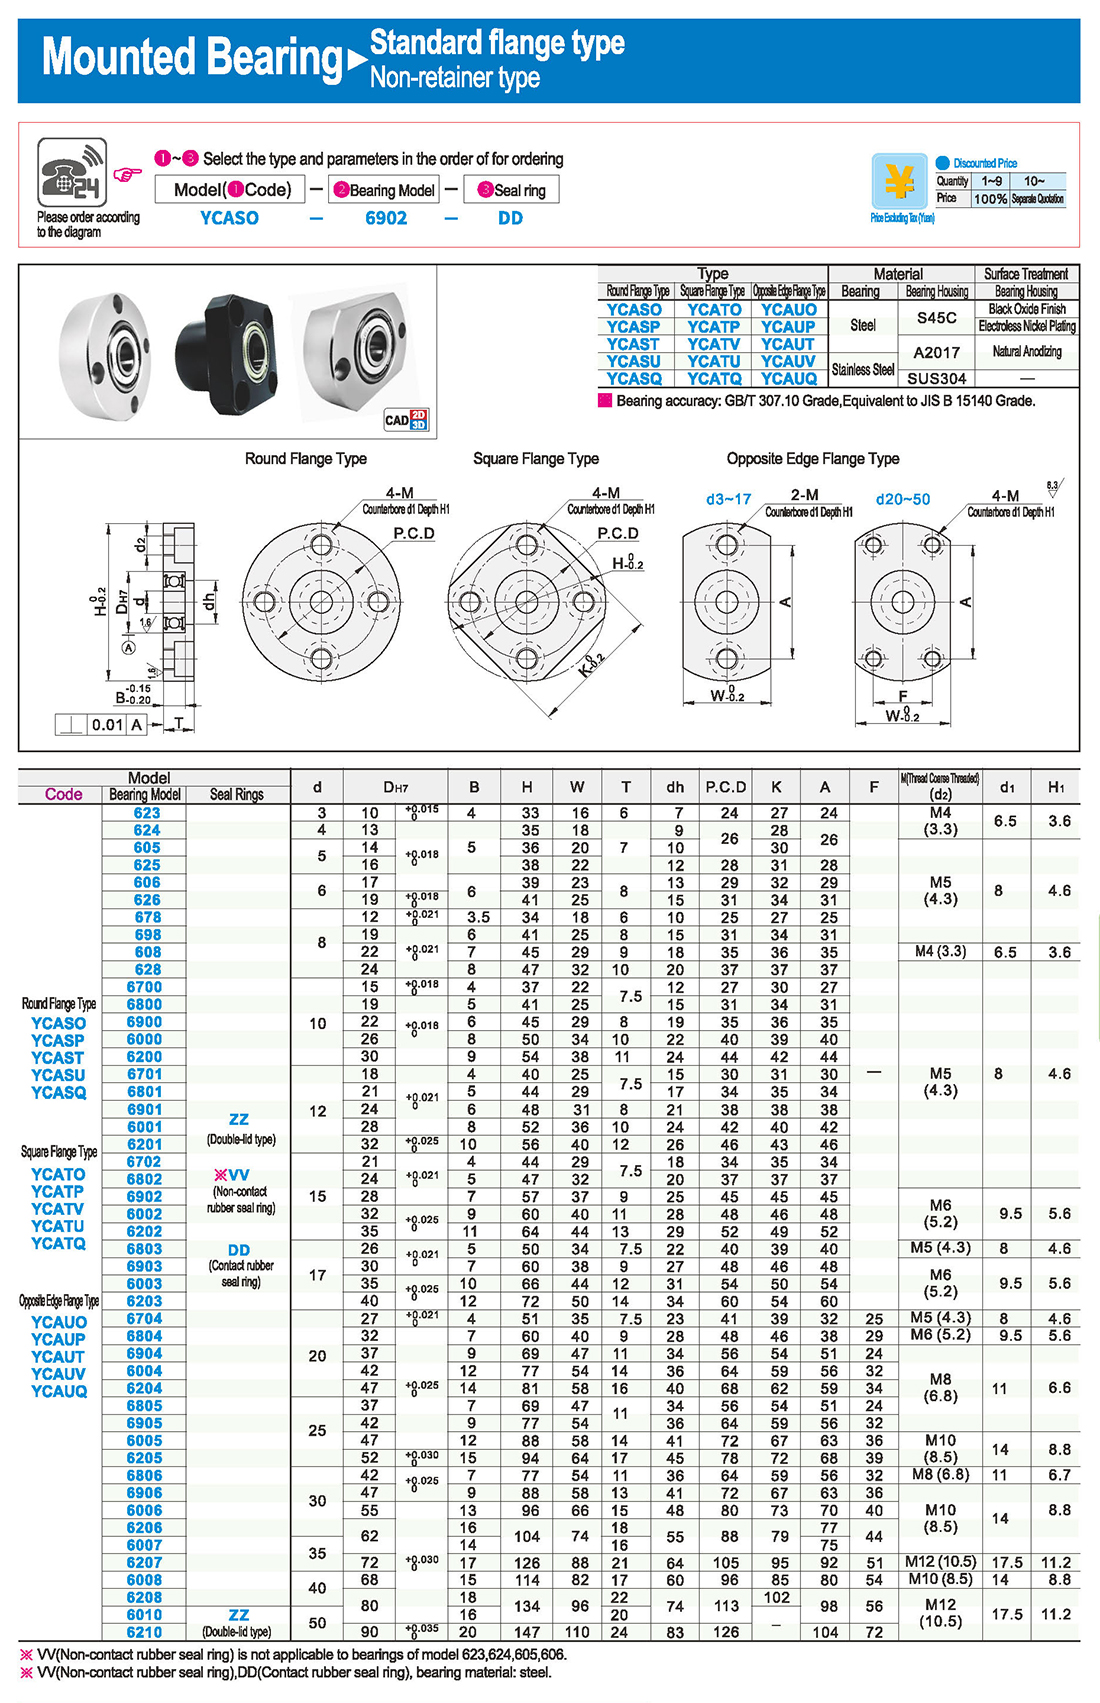
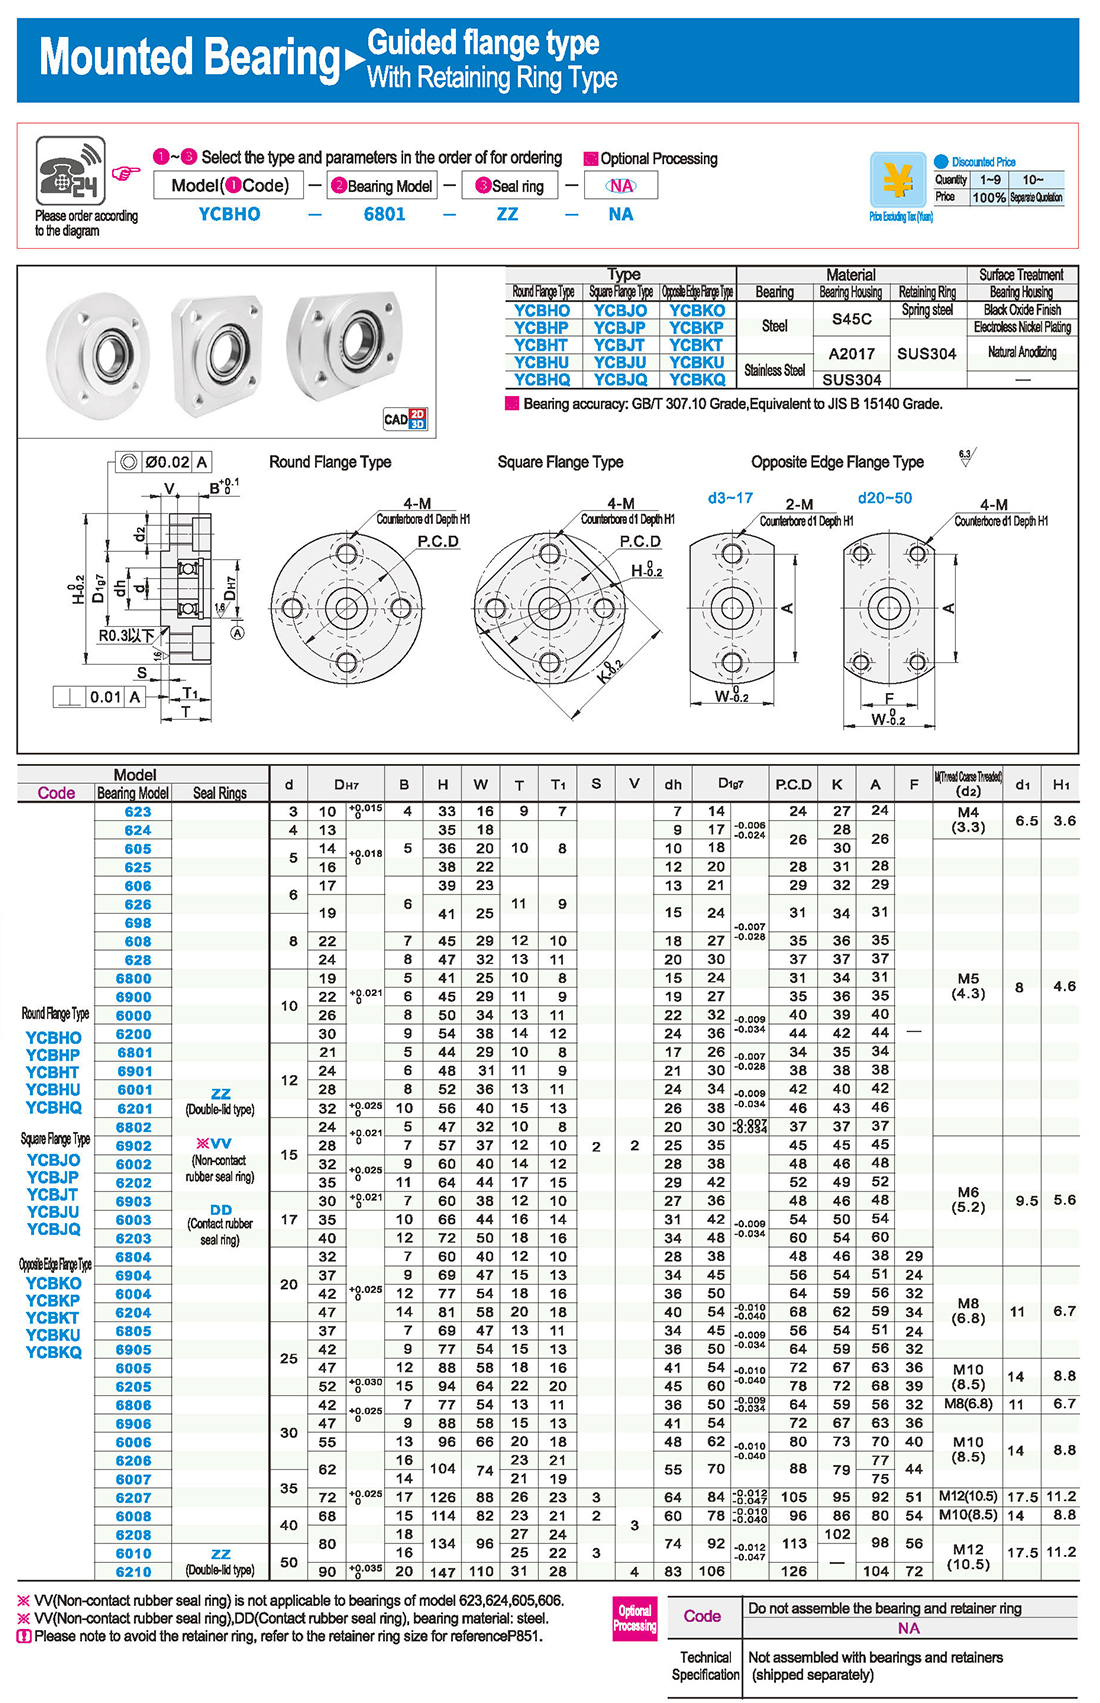
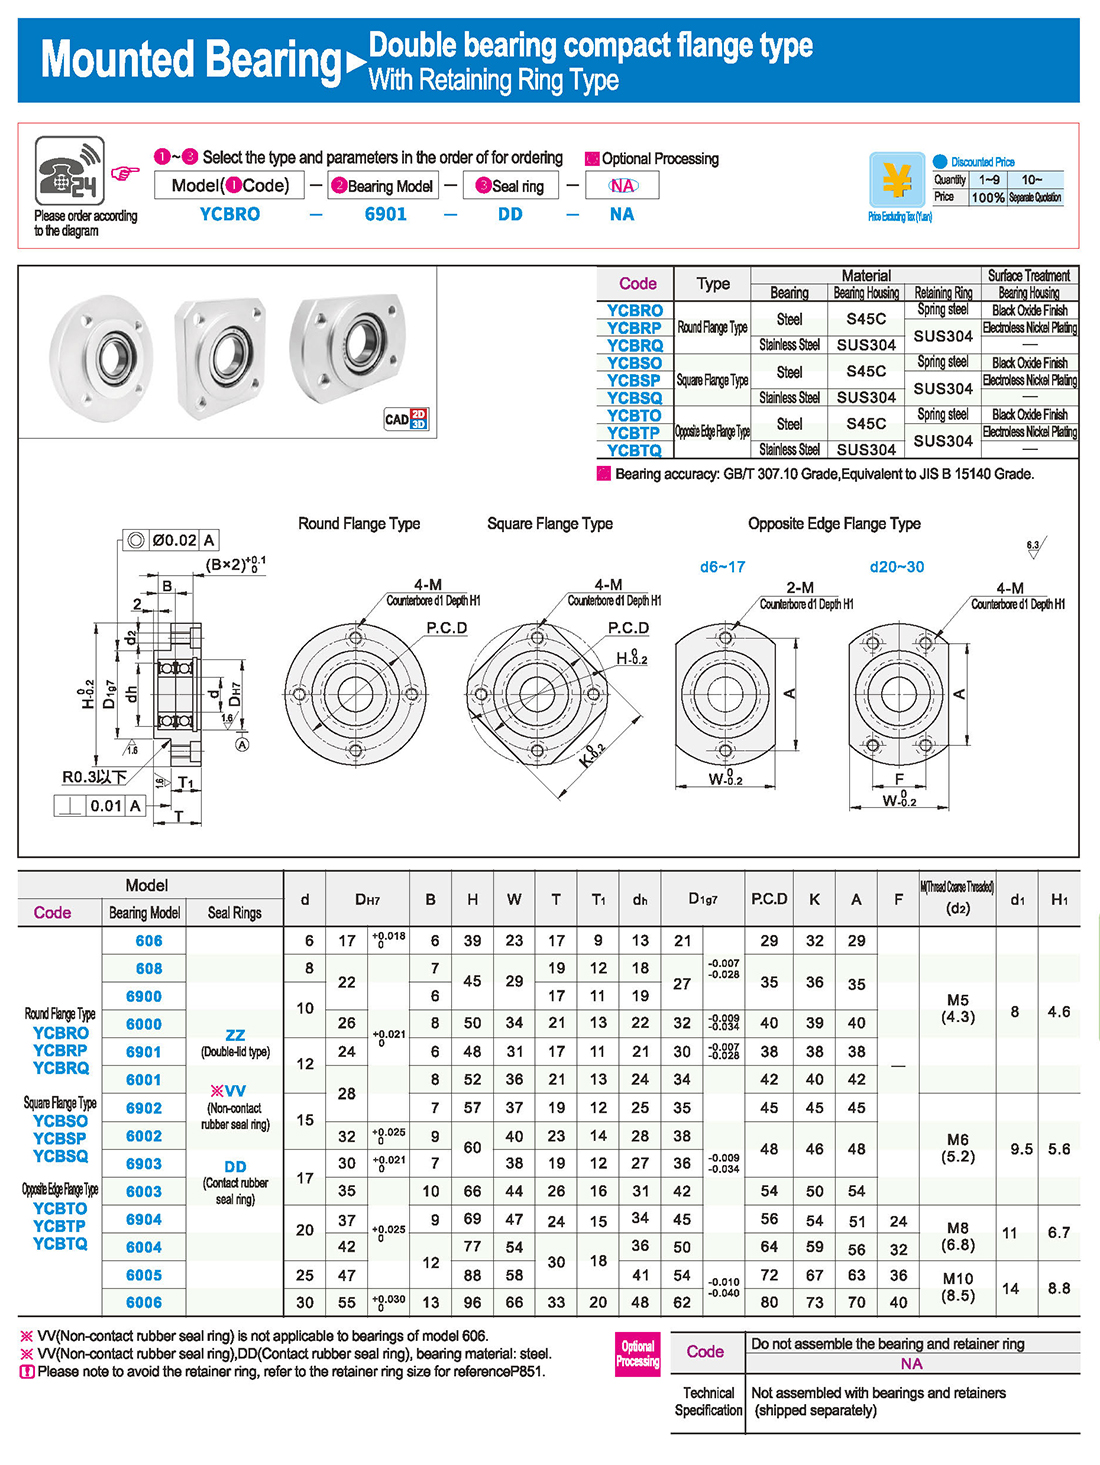
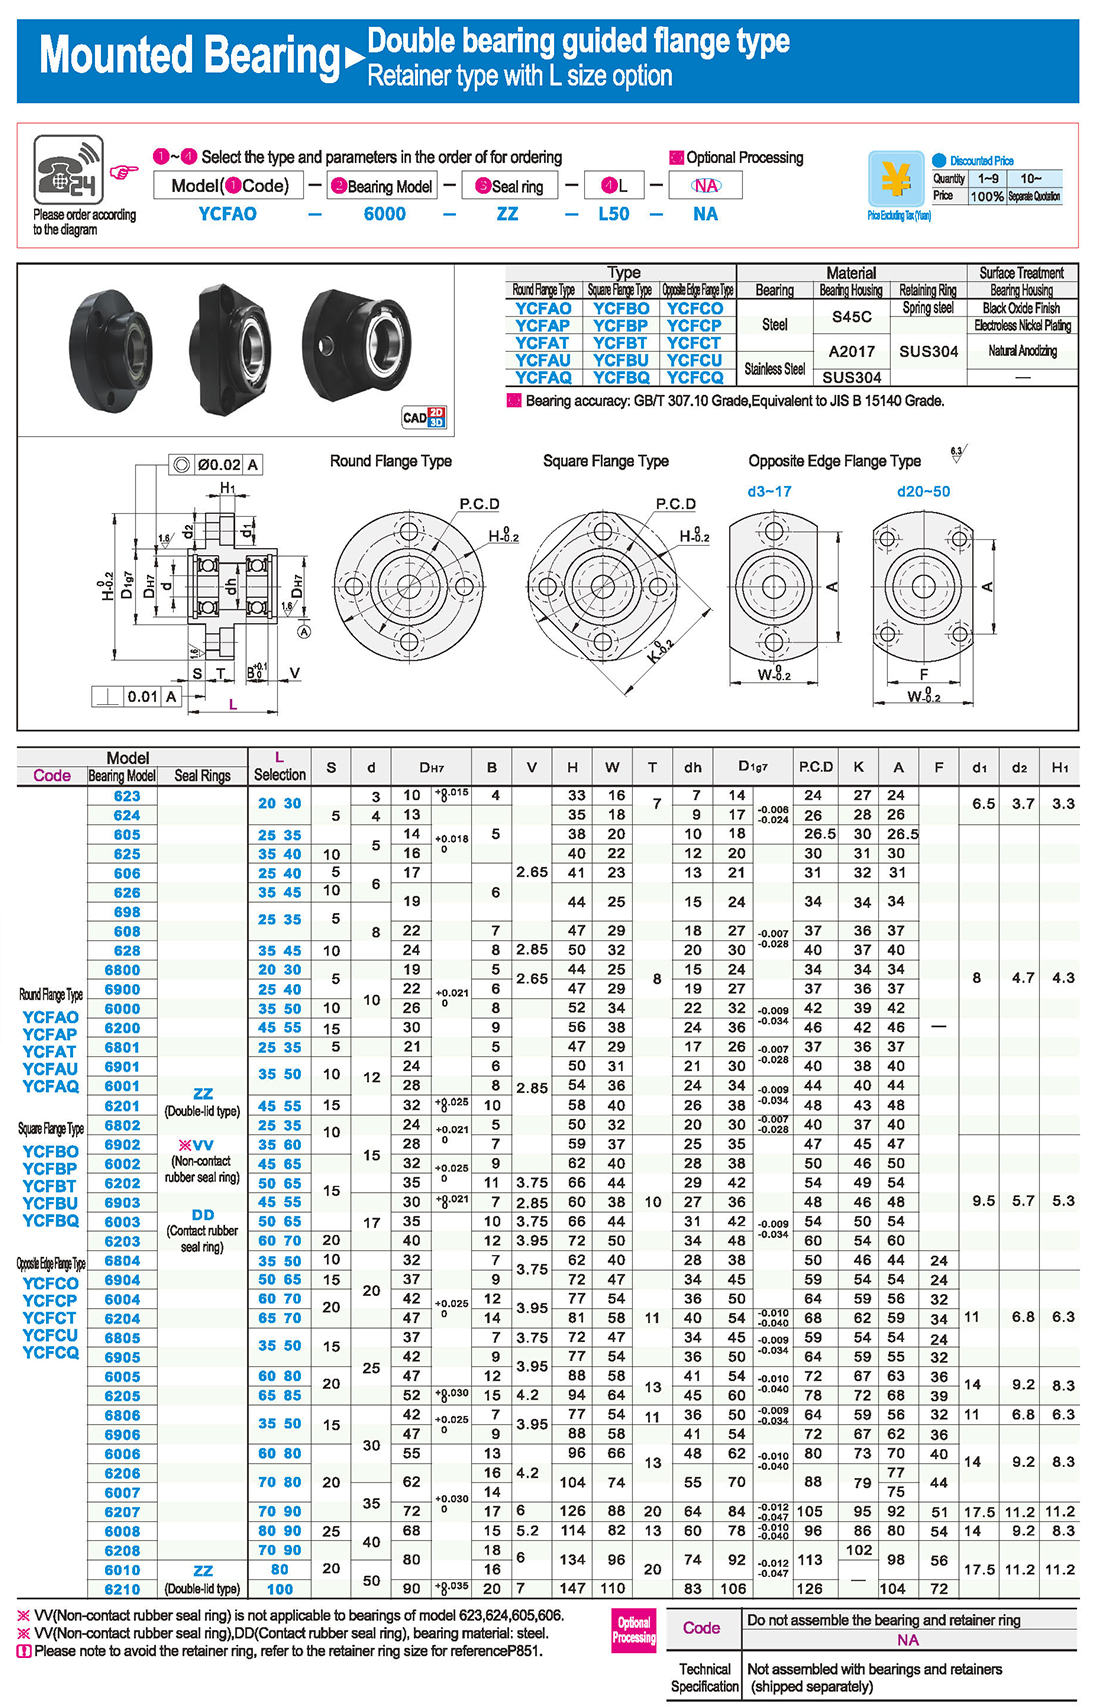
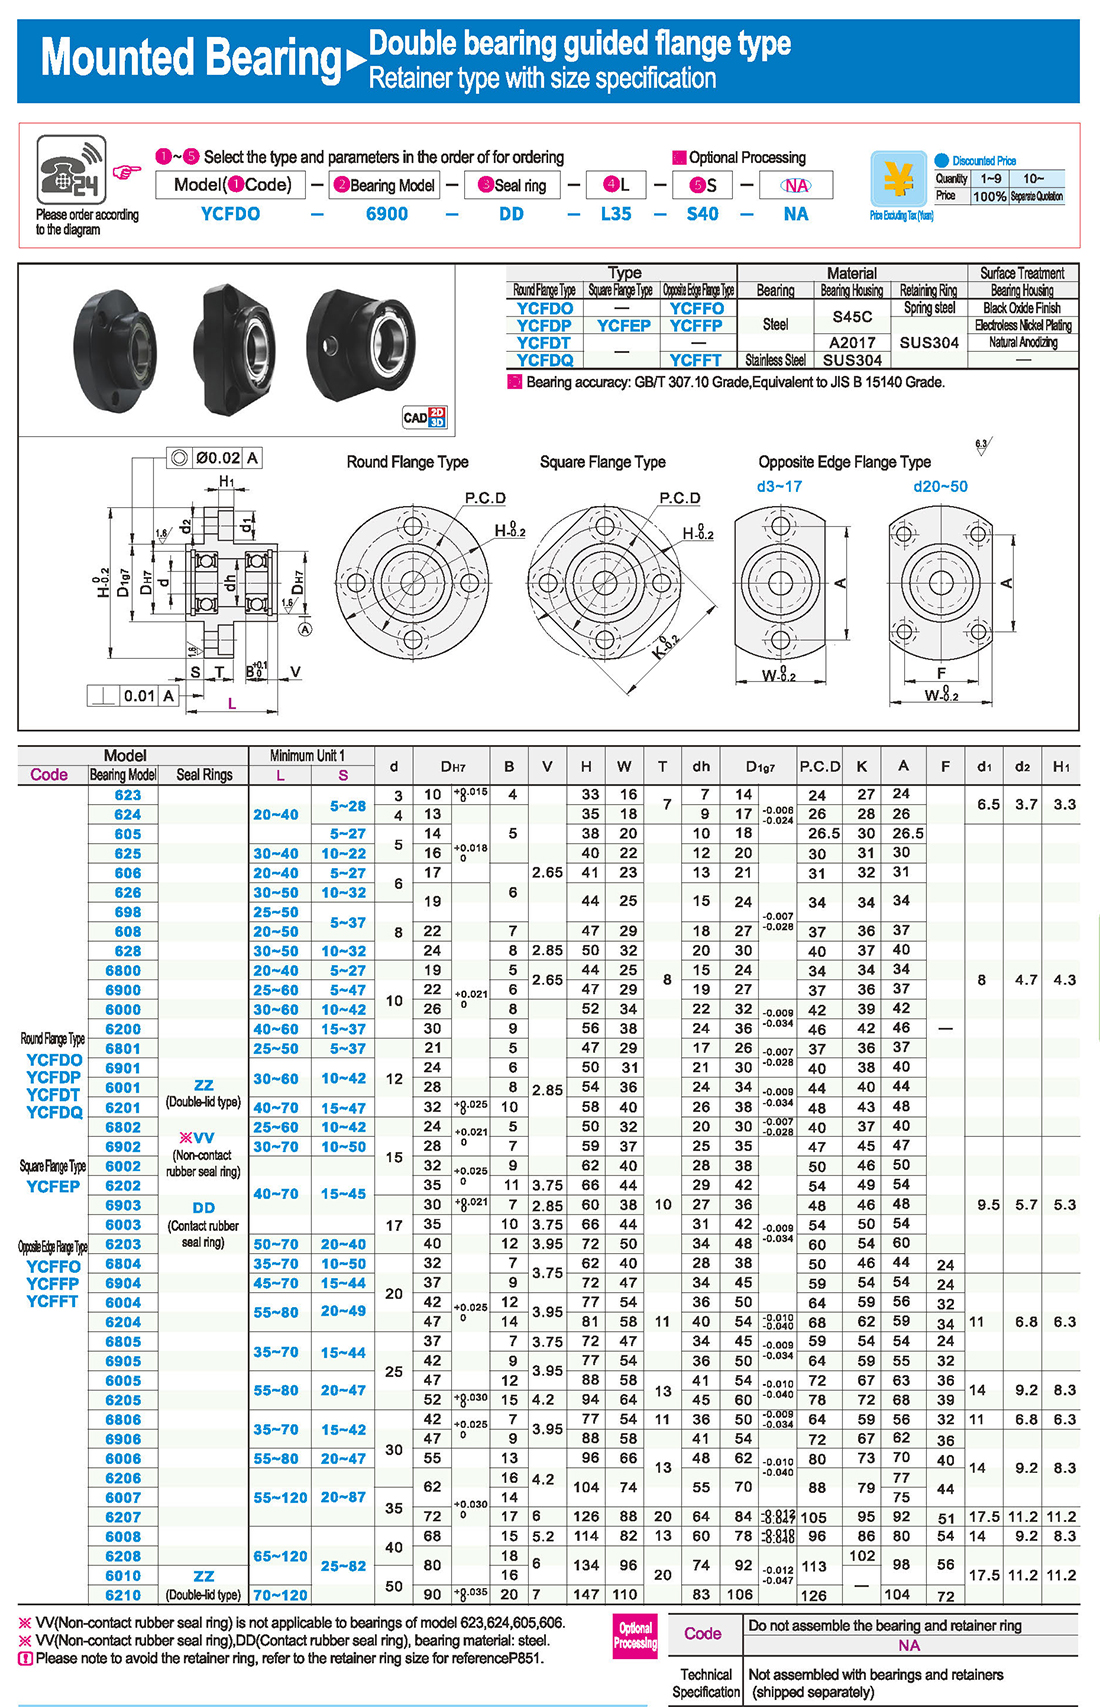
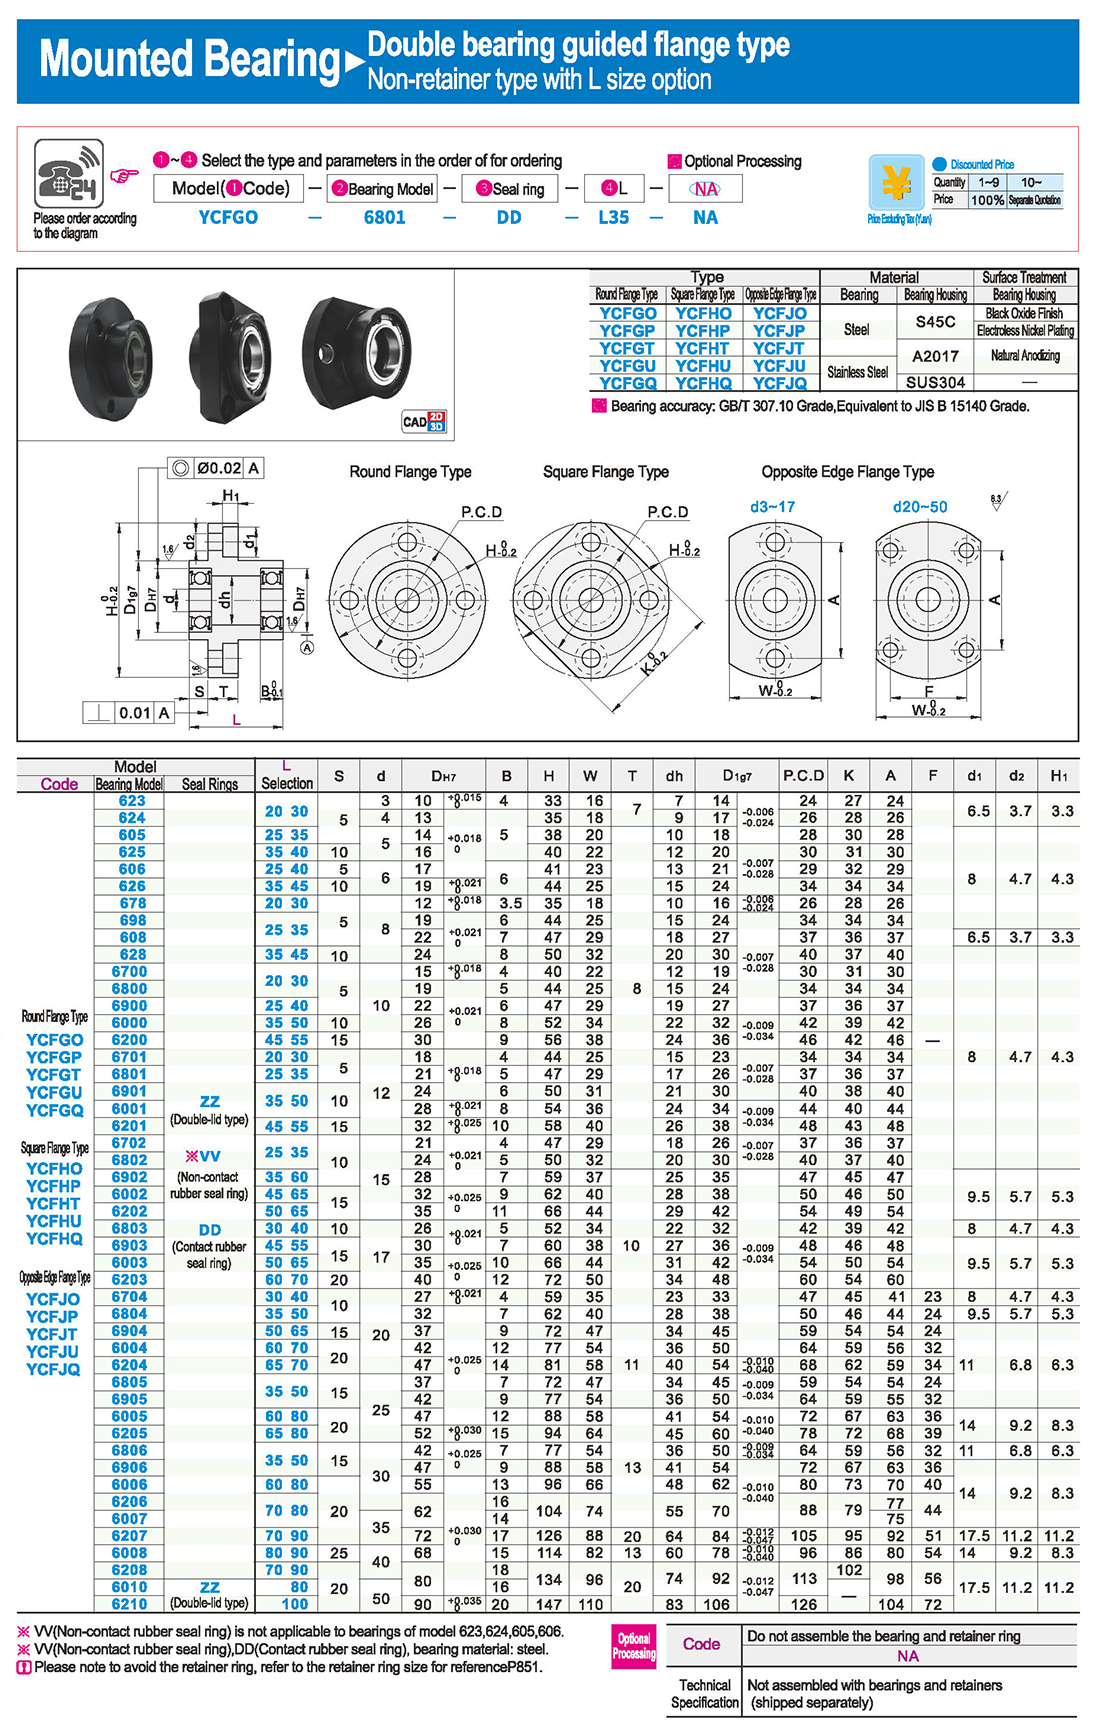
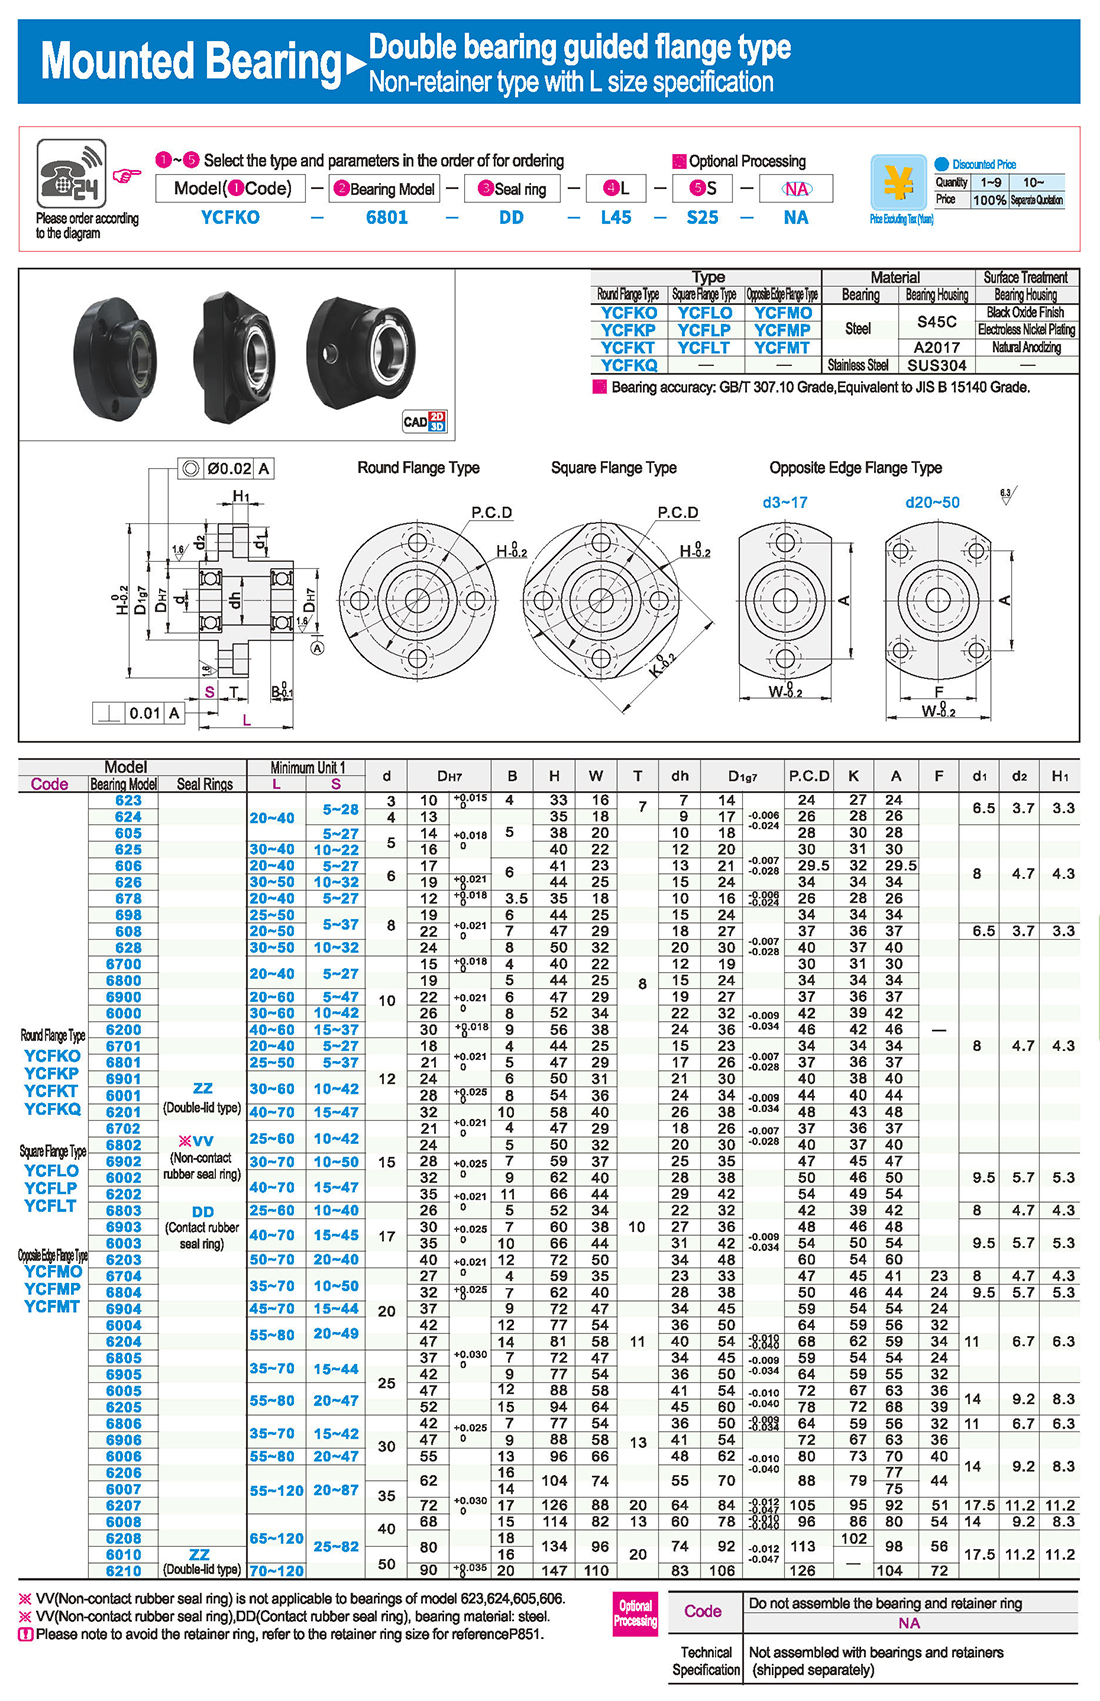
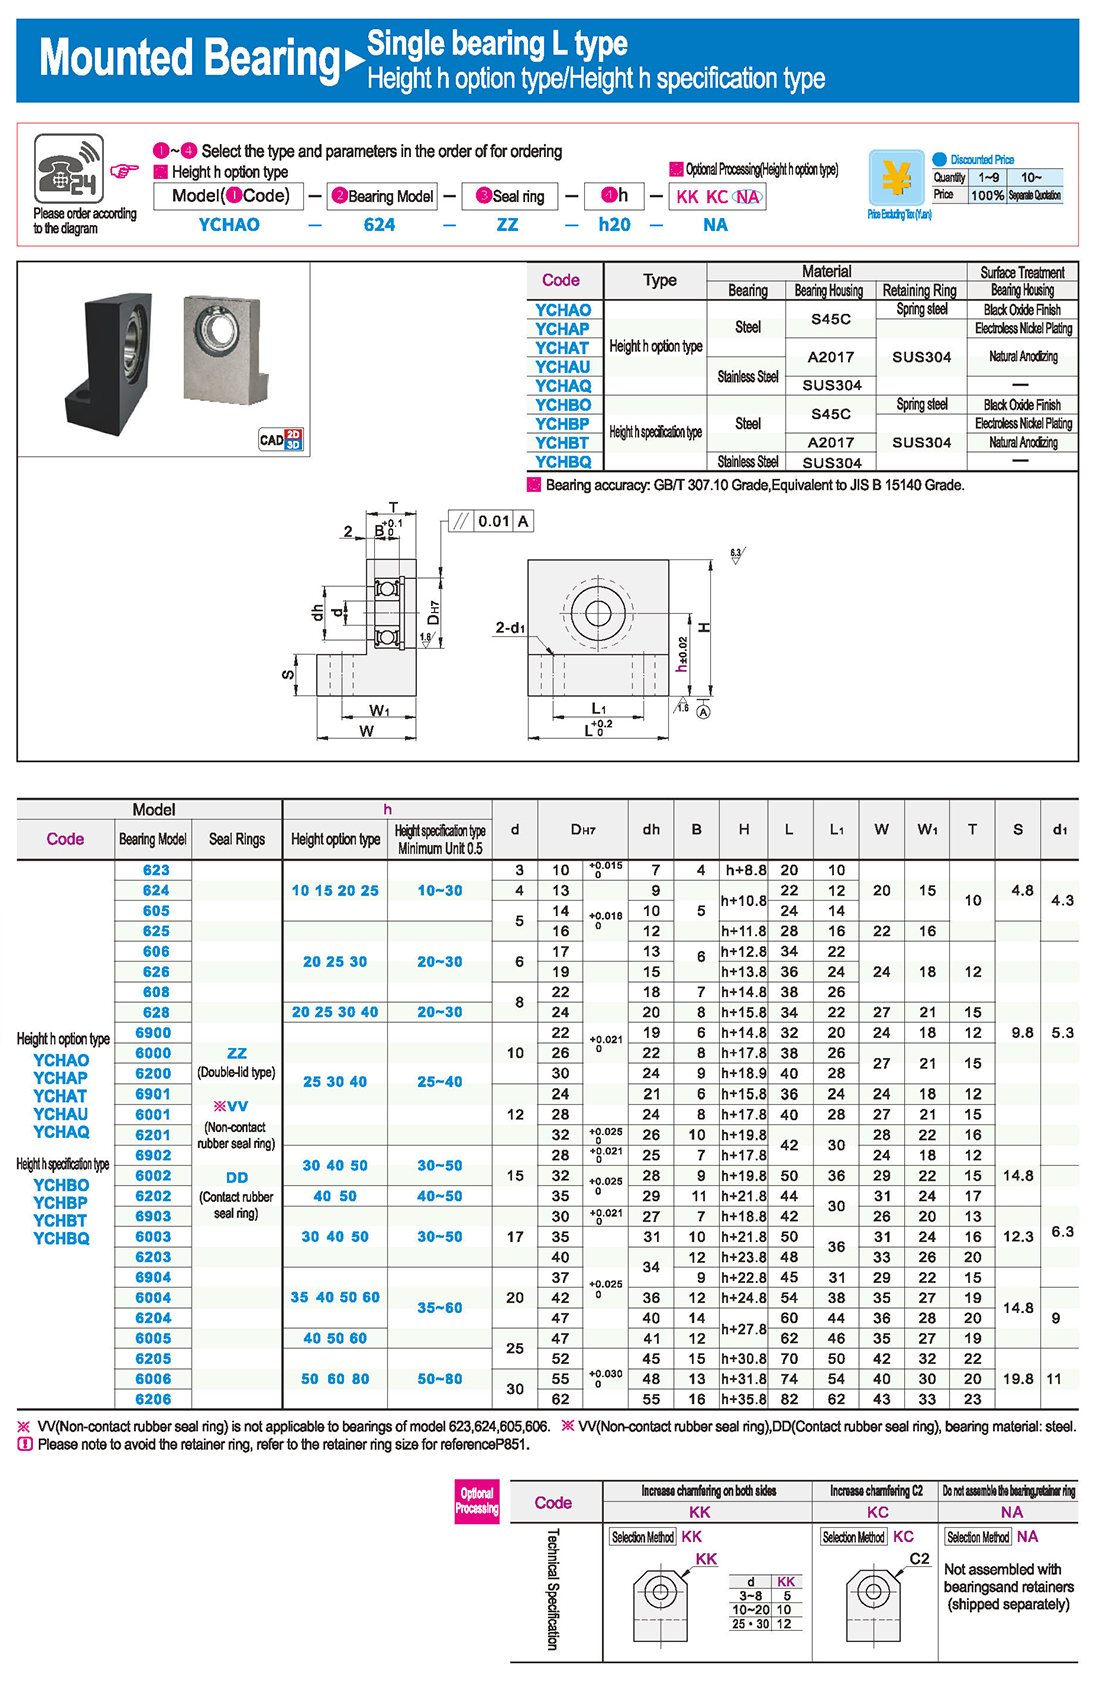
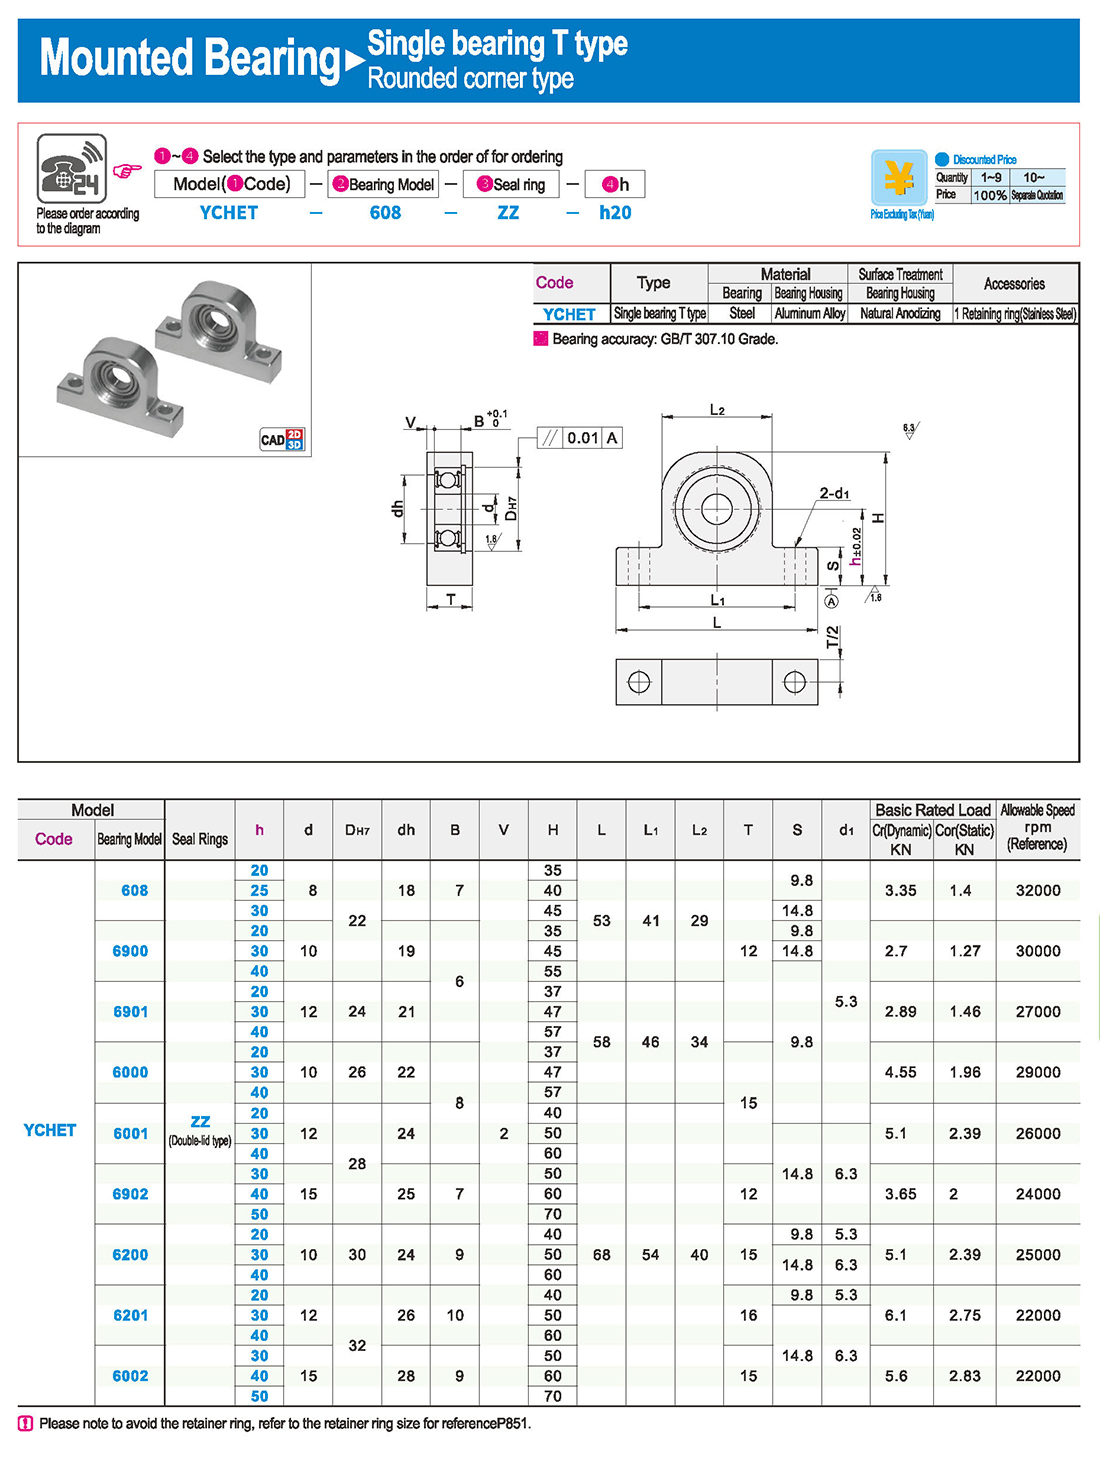
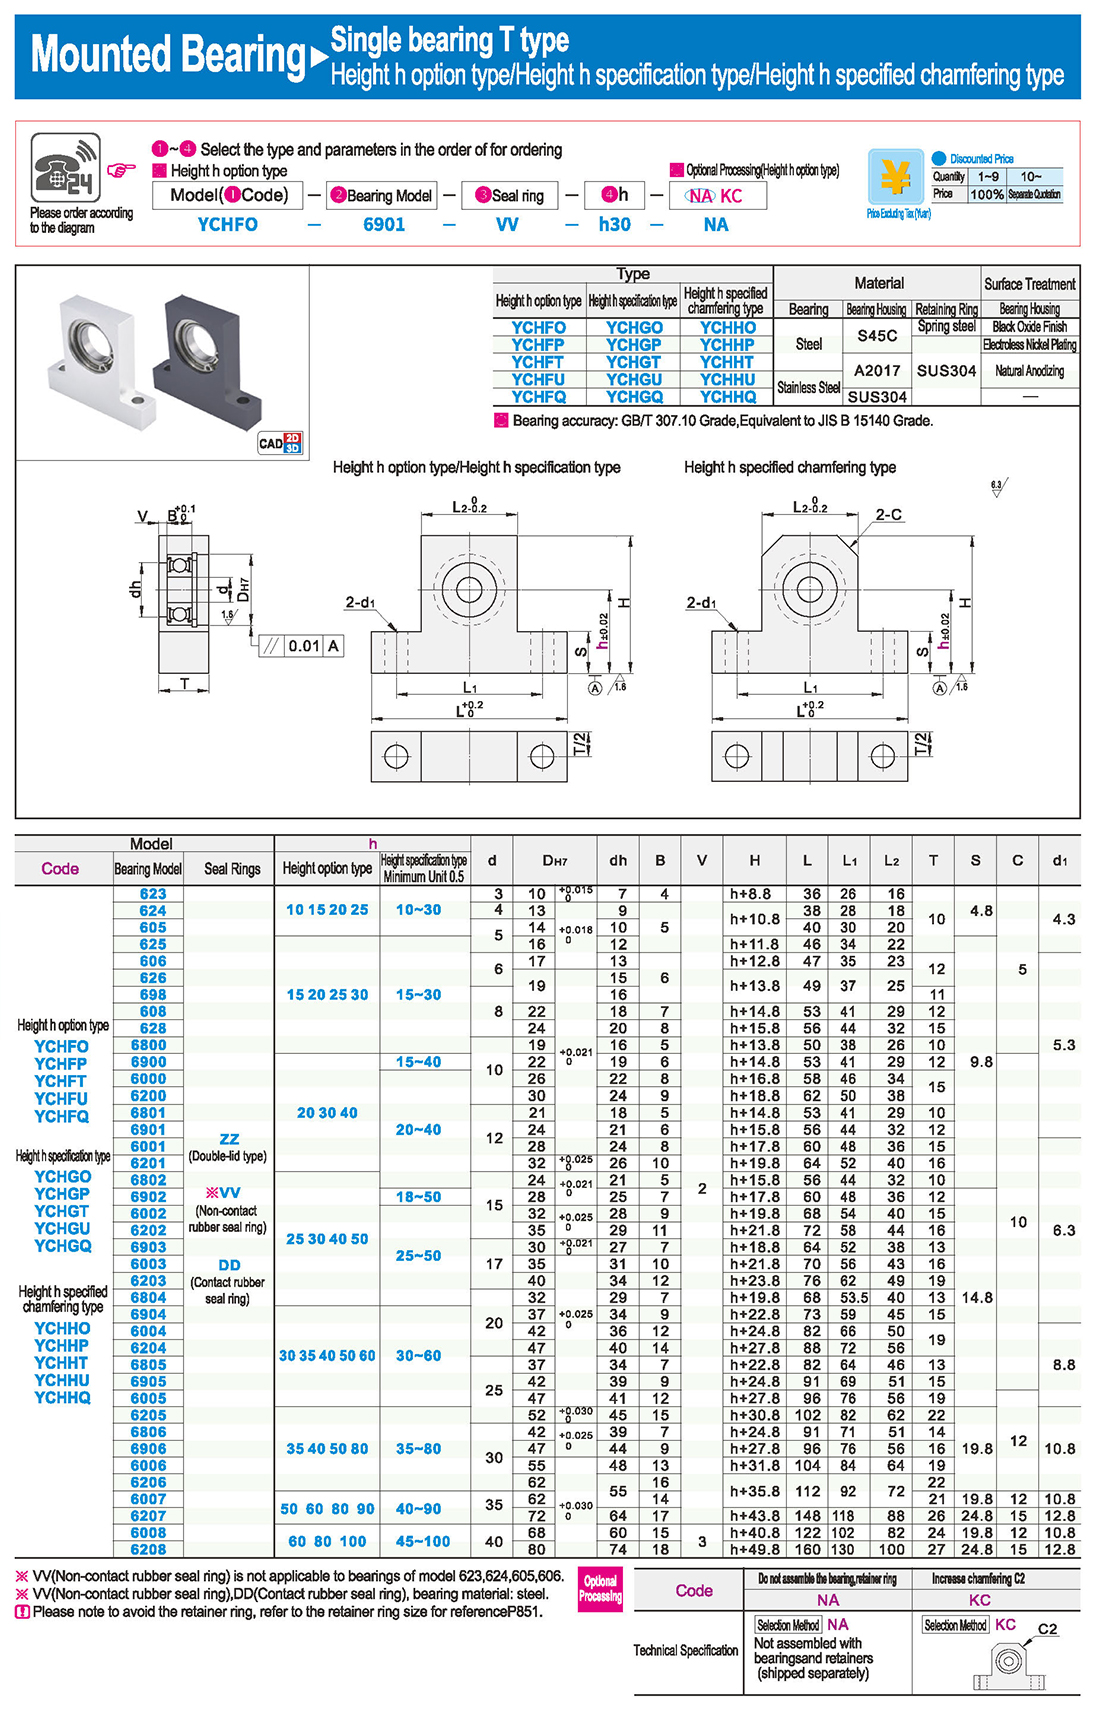
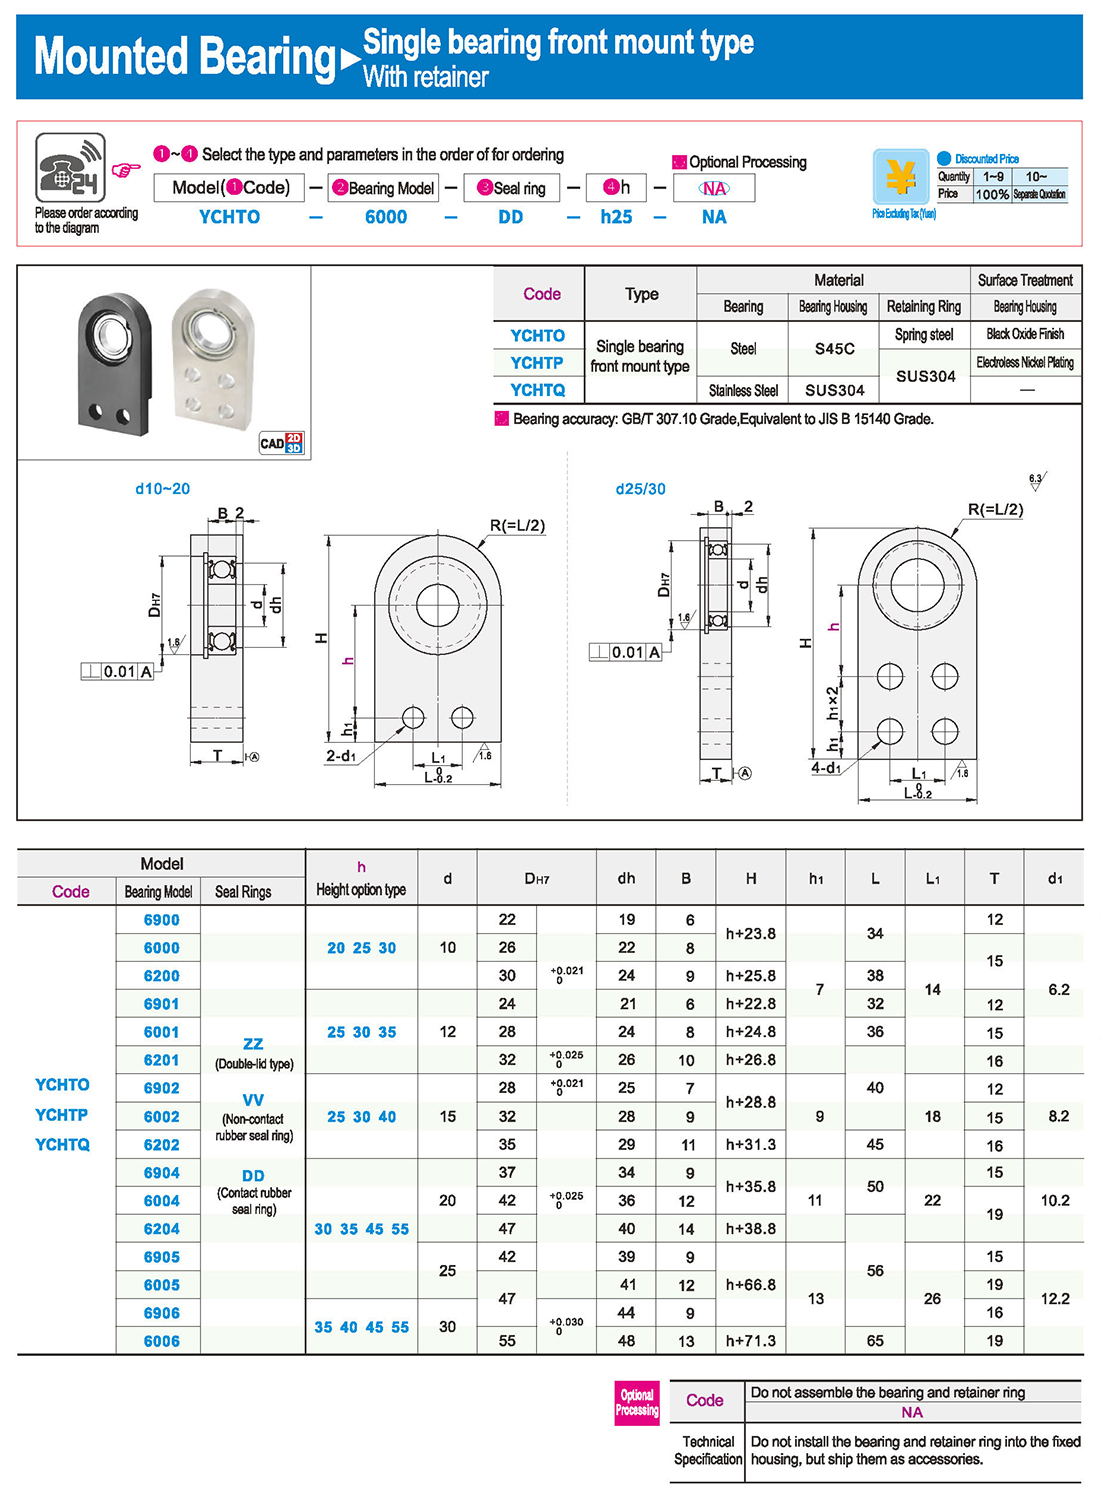
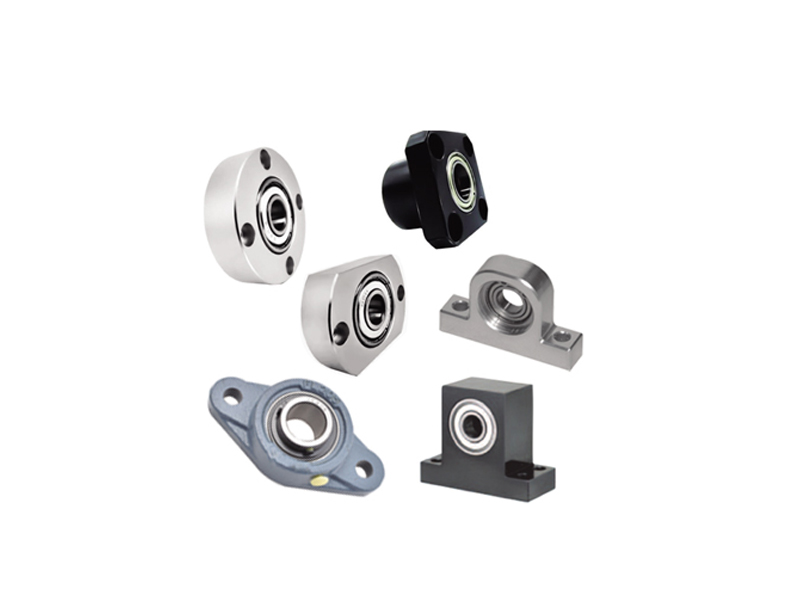
Смонтированный подшипник представляет собой общую форму подшипника, которая сочетает подшипник качения и подшипник сиденья, образуя подшипник с разнообразной структурой, универсальностью и хорошей взаимозаменяемостью. Этот подшипник имеет много преимуществ в механическом оборудовании, и ниже приводится подробное описание его преимуществ:
1. Высокая пропускная способность:
Он может выдерживать большие радиальные и осевые нагрузки и имеет высокую грузоподъемность, которая подходит для всех видов тяжелых нагрузок и высокоскоростной работы механического оборудования.
2. Простая установка:
С монтажными отверстиями и нитями, он может быть легко установлен на оборудовании, снижая трудности и стоимость установки.
3. Долгая жизнь:
Внутренняя смазка или жир добавляется для уменьшения трения и износа, тем самым продлевая срок службы подшипника.
4. Простота обслуживания:
Имеются лубрикационные отверстия, которые могут легко заполняться и заменять жир или смазочные материалы, что снижает трудности и затраты на техническое обслуживание.
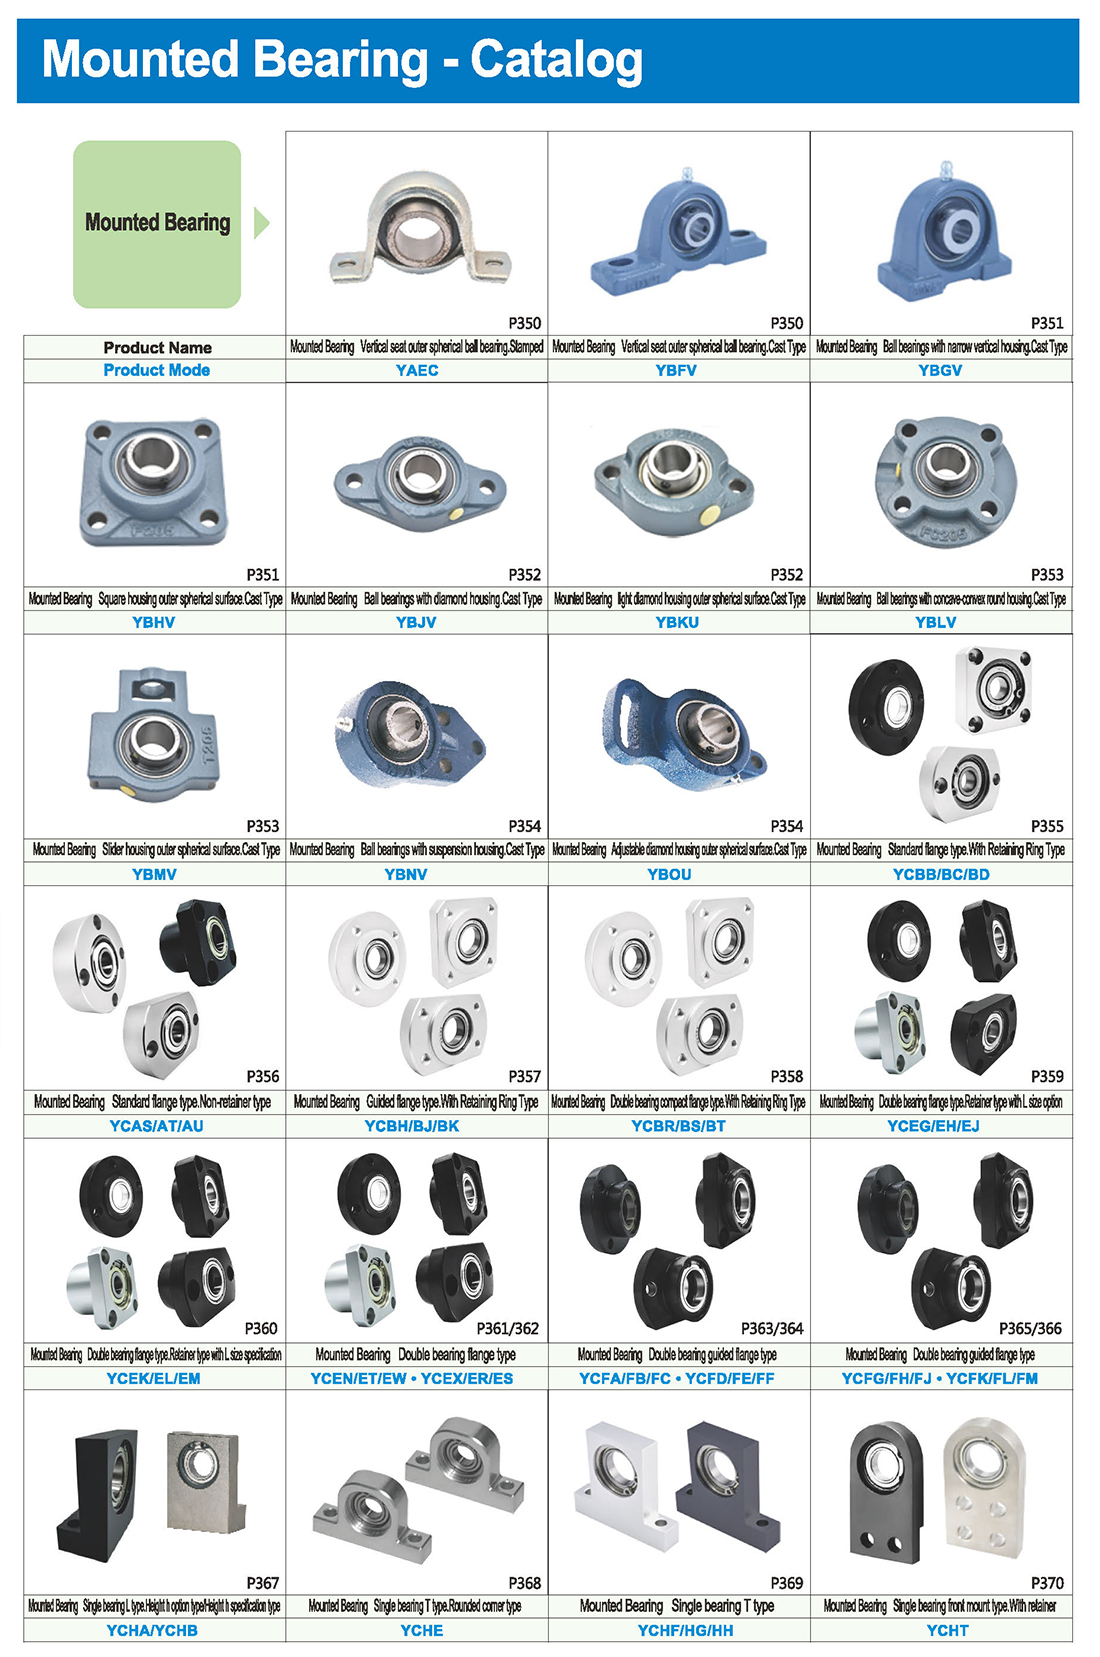
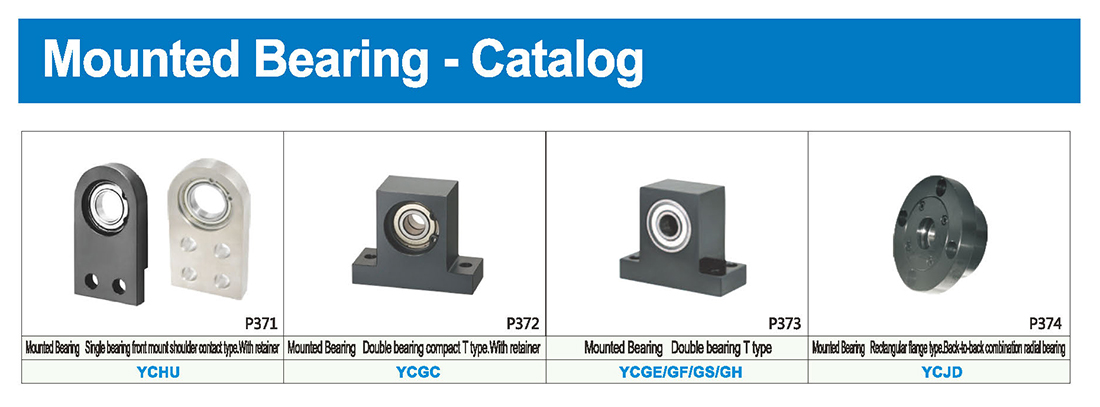
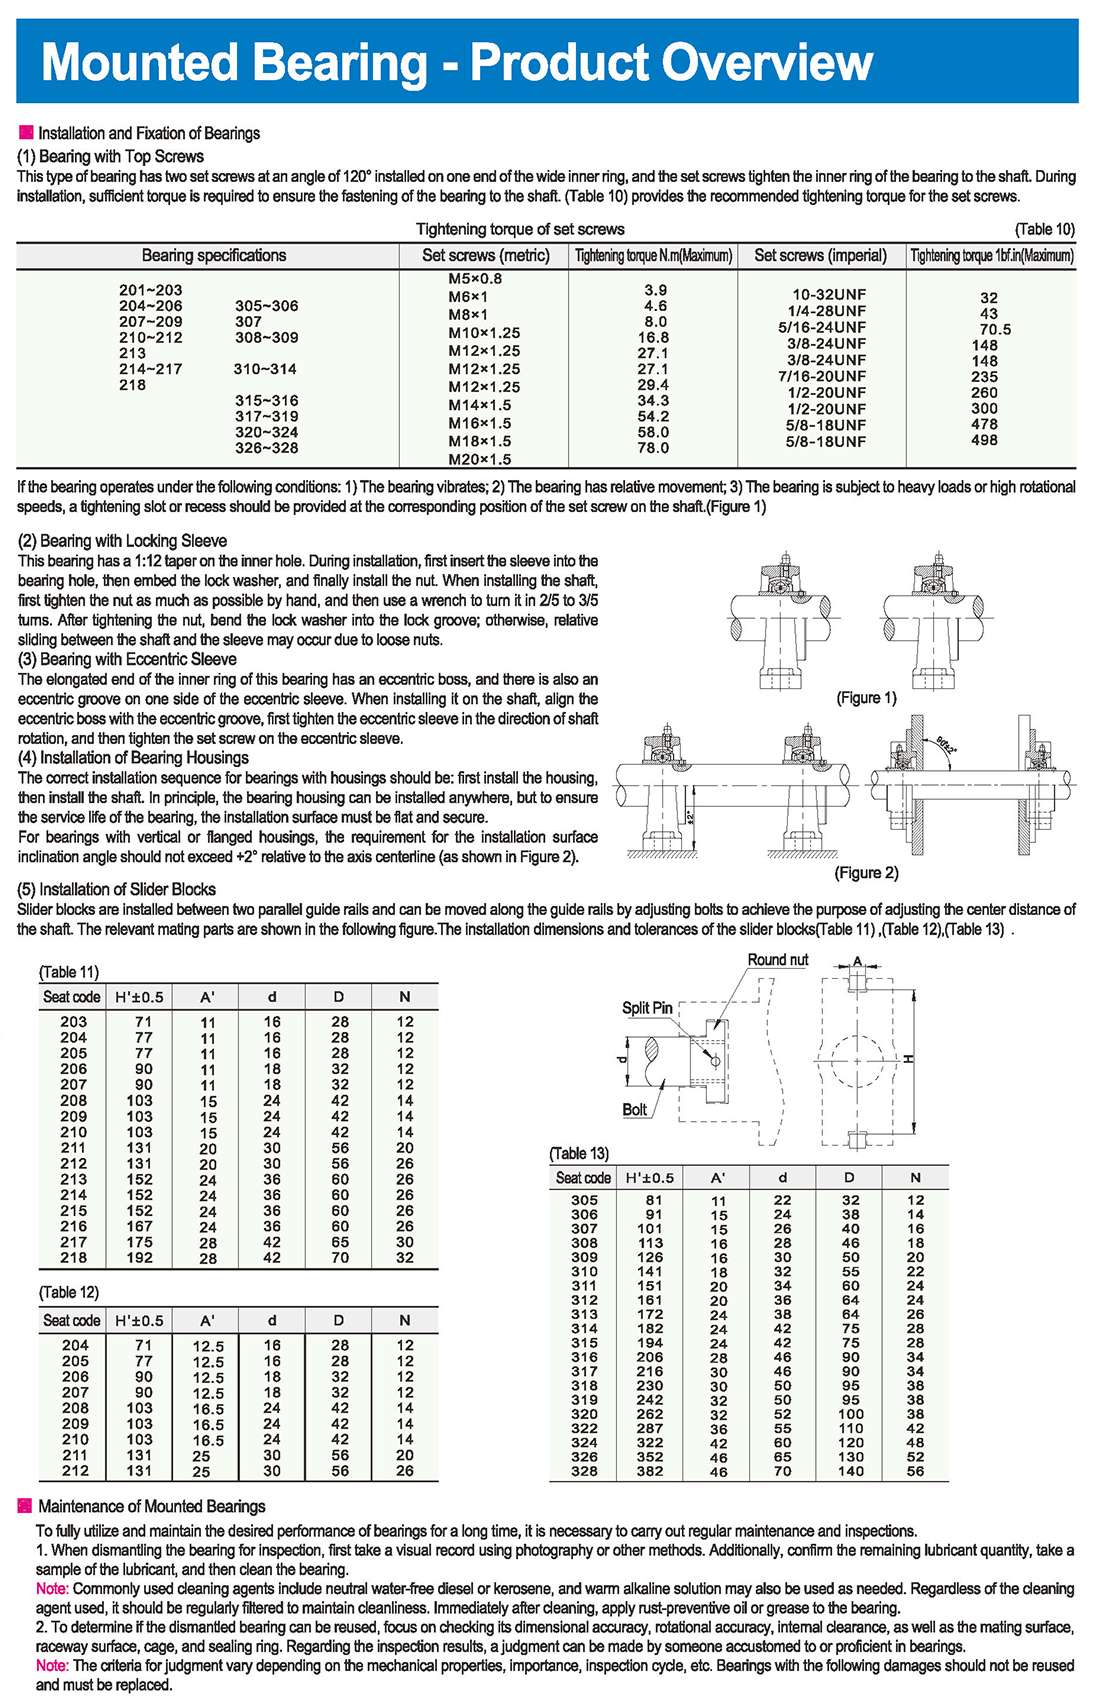
Installation and Fixation of Bearings
(1) Bearing with Top Screws
This type of bearing has two set screws at an angle of 120° installed on one end of the wide inner ring, and the set screws tighten the inner ring of the bearing to the shaft. During installation, sufficient torque is required to ensure the fastening of the bearing to the shaft. (Table 10) provides the recommended tightening torque for the set screws.
Tightening torque of set screws, Bearing specifications, Set screws (metric/imperial), Maximum tightening torque
If the bearing operates under the following conditions: 1) The bearing vibrates; 2) The bearing has relative movement; 3) The bearing is subject to heavy loads or high rotational speeds, a tightening slot or recess should be provided at the corresponding position of the set screw on the shaft
(2) Bearing with Locking Sleeve
This bearing has a 1:12 taper on the inner hole. During installation, first insert the sleeve into the bearing hole, then embed the lock washer, and finally install the nut. When installing the shaft, first tighten the nut as much as possible by hand, and then use a wrench to turn it in 2/5 to 3/5 turns. After tightening the nut, bend the lock washer into the lock groove; otherwise, relative sliding between the shaft and the sleeve may occur due to loose nuts.
(3) Bearing with Eccentric Sleeve
The elongated end of the inner ring of this bearing has an eccentric boss, and there is also an eccentric groove on one side of the eccentric sleeve. When installing it on the shaft, align the eccentric boss with the eccentric groove, first tighten the eccentric sleeve in the direction of shaft rotation, and then tighten the set screw on the eccentric sleeve.
(4) Installation of Bearing Housings
The correct installation sequence for bearings with housings should be: first install the housing, then install the shaft. In principle, the bearing housing can be installed anywhere, but to ensure the service life of the bearing, the installation surface must be flat and secure.
For bearings with vertical or flanged housings, the requirement for the installation surface inclination angle should not exceed +2° relative to the axis centerline (as shown in Figure 2).
(5) Installation of Slider Blocks
Slider blocks are installed between two parallel guide rails and can be moved along the guide rails by adjusting bolts to achieve the purpose of adjusting the center distance of the shaft. The relevant mating parts are shown in the following figure.
The installation dimensions and tolerances of the slider blocks are according to the specifications of the round nuts and bolts.
Maintenance of Mounted Bearings
To fully utilize and maintain the desired performance of bearings for a long time, it is necessary to carry out regular maintenance and inspections.
1. When dismantling the bearing for inspection, first take a visual record using photography or other methods. Additionally, confirm the remaining lubricant quantity, take a sample of the lubricant, and then clean the bearing.
Note: Commonly used cleaning agents include neutral water-free diesel or kerosene, and warm alkaline solution may also be used as needed. Regardless of the cleaning agent used, it should be regularly filtered to maintain cleanliness. Immediately after cleaning, apply rust-preventive oil or grease to the bearing.
1. To determine if the dismantled bearing can be reused, focus on checking its dimensional accuracy, rotational accuracy, internal clearance, as well as the mating surface, raceway surface, cage, and sealing ring. Regarding the inspection results, a judgment can be made by someone accustomed to or proficient in bearings.
Note: The criteria for judgment vary depending on the mechanical properties, importance, inspection cycle, etc. Bearings with the following damages should not be reused and must be replaced.


 Английский язык
 Русский язык
 На испанском языке
 На итальянском языке
 Арабский язык
 Корейская народно-демократическая республика
 Немецкий язык
 На японском языке
 На вьетнамском языке
 На турецком языке
 1. Введение
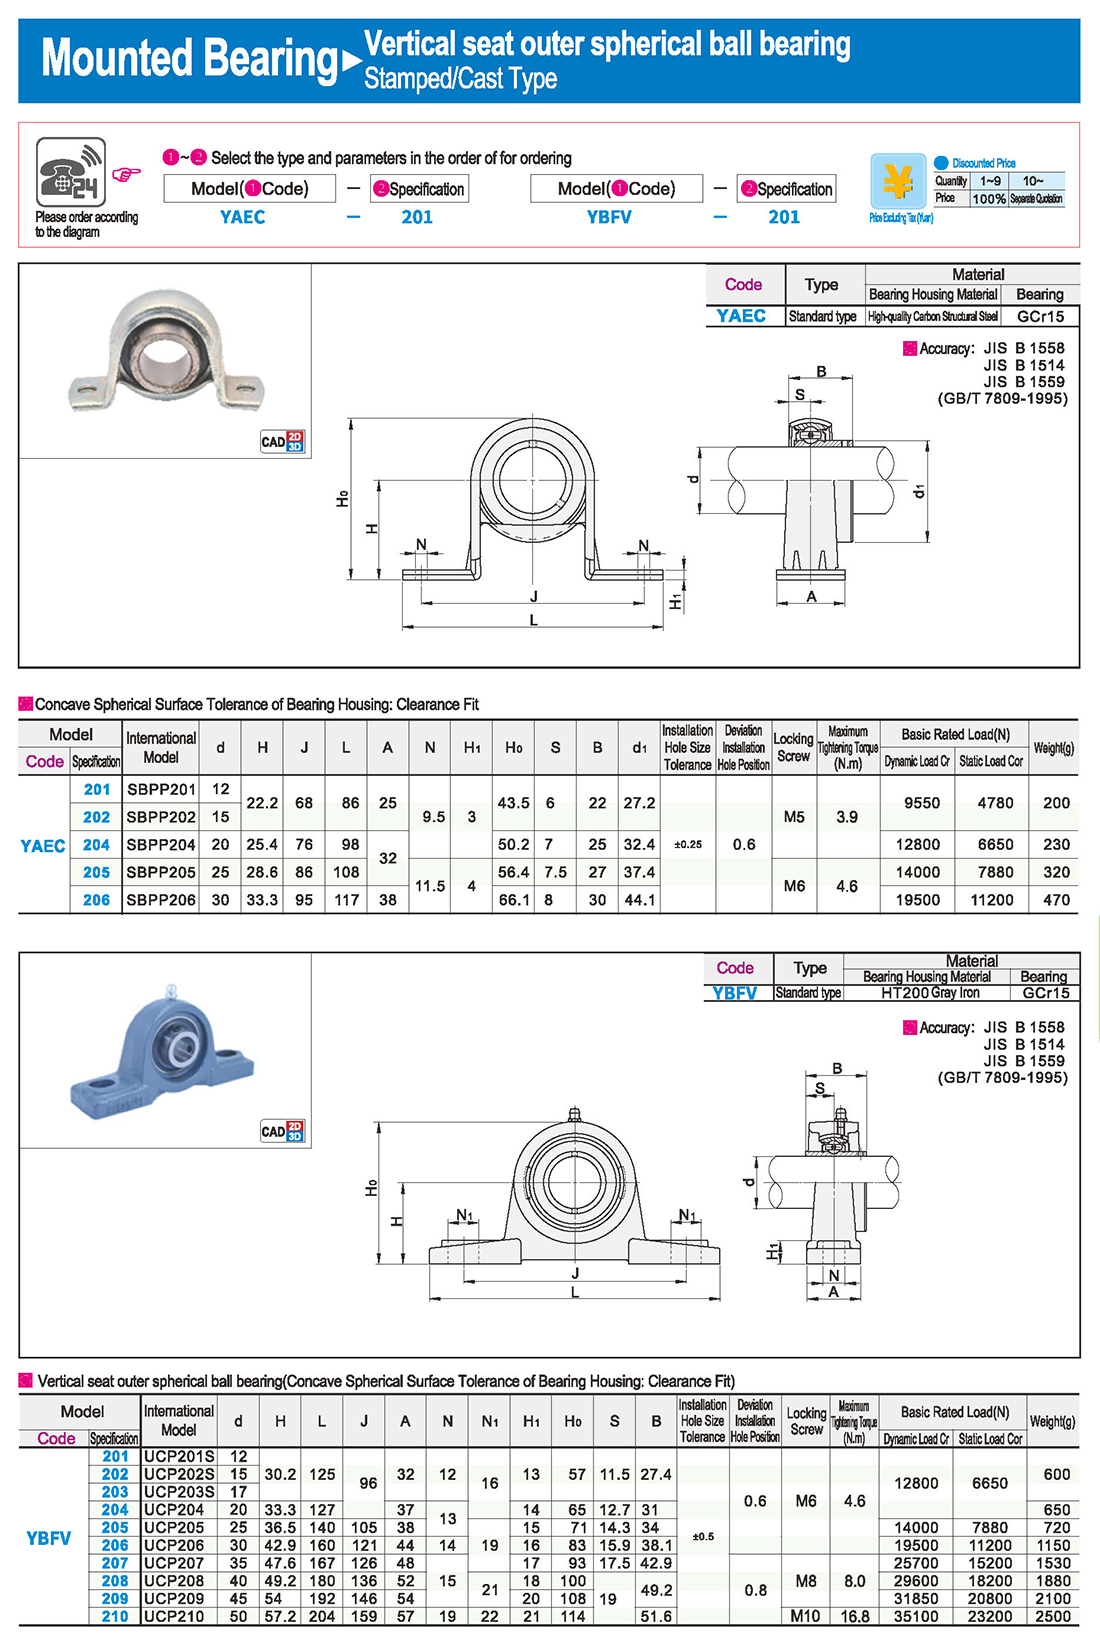
 Таблица технических характеристик
 скачать


